Monday 30 July 2012

Week 3

Task for today

Remake of my environment

Geocontrol screenshot
I had to remake my geocontrol and cryengine environment because my usb got wiped :( so below are some updated shots of what I made.


Cryengine environment import.


Cryengine inspiration from 4 reference images

Landscape, by William Gilpin


 Landscape with Apollo and the Muses  

Fragments on the theory and practice of landscape gardening


Lion Forest Garden 


Images from various landscape painters/ landscape architects/ architects/ gardens


Lion Forest Garden


Joseph Mallord William Turner
The Burning of the Houses of Parliament


William Gilpin
Landscape, by William Gilpin (1724-1804). Watercolour. England, 18th-19th century.

Claude Lorrain
 Landscape with Apollo and the Muses (1652). Oil.

Humphry Repton
Fragments on the theory and practice of landscape gardening, 1816


Capability Brown
Chatsworth house garden


Independent Study

My fifth reference image is of the swiss alps 

Below is a quick video of my environment :)

Monday 23 July 2012

Week 2

Different images of landscapes:

1.

Plateau Landscape
Vegetation: Scarce vegetation, mostly plants that can withstand the heat and lack of water. 
Terrain:  Dry land, with rocky plateaus that seem to come out of a small hill then rises to make a mini mountain.
Lighting: The photo seems to be taken in the late afternoon, so the lighting is a bit dimmer in addition, the clouds that spread  across the sky mimic the darker colours of the plateau.

2.
Swiss Alps, Switzerland


Vegetation: There is an abundance of grass that cover the less mountainous area, whilst the mountain has no apparent vegetation.
Terrain: The Swiss Alps have quite a rough terrain, mainly because of the mountain's rocky surface whilst the base of the mountain have a more softer look because of the vegetation.
Lighting:
It looks like it's about mid-day. The natural sunlight gives an effect of a picturesque landscape although there is a hazy feel to the top of the mountain because of its height, it almost seems to fade into the sky.

3.
Desert

Vegetation: Scarce vegetation, mostly shrubs/plants called spinifex grass.
Terrain: The terrain encases small hills of sand, but where there is no sand there is rocks that are protruding from the ground.
Lighting:
The lighting from the sun envelopes the desert, the light allows the rocks that stick out of the ground to clearly define the shape of itself with the shadows that are cast by the sun.

4.
Forest
Vegetation: Small shrubs can be seen from the bottom and some grass. The majority of the forest is taken up by tall trees.
Terrain: From this picture, the terrain seems smooth and has no sign of any hills or mountains.
Lighting: The lighting has a muffled effect of light that comes from behind the trees. It is evident that the sun is setting by the yellow/orange colour of the light which sets a mystical mood to the landscape.


5.
Catalina Island
Vegetation: Trees are mostly seen from the top, and grass covers the higher parts of the island.
Terrain: The Island has a rocky terrain coming from the bottom where the water touches the island. It seems that the rocky terrain comes from the erosion from the water and wind.
Lighting: The lighting seems to be coming from the mid-day or morning sunlight. I found that it's worthwhile to note that the farther away the island is, the hazier the land is.

Image of my country of origin:

Philippines :)


Vegetation: Treesare evident from the top to the bottom of the land, and also most likely has plants, shrubs and grass.
Terrain: It is flat until the mountain rises up from the flat terrain, where it presents an irregular and rocky terrain as it reaches the top of the mountain.
Lighting: The lighting is quite nice as it sets a relaxing view to the image, although the clouds distort the light as it covers some of the mountain and give a mysterious feeling.
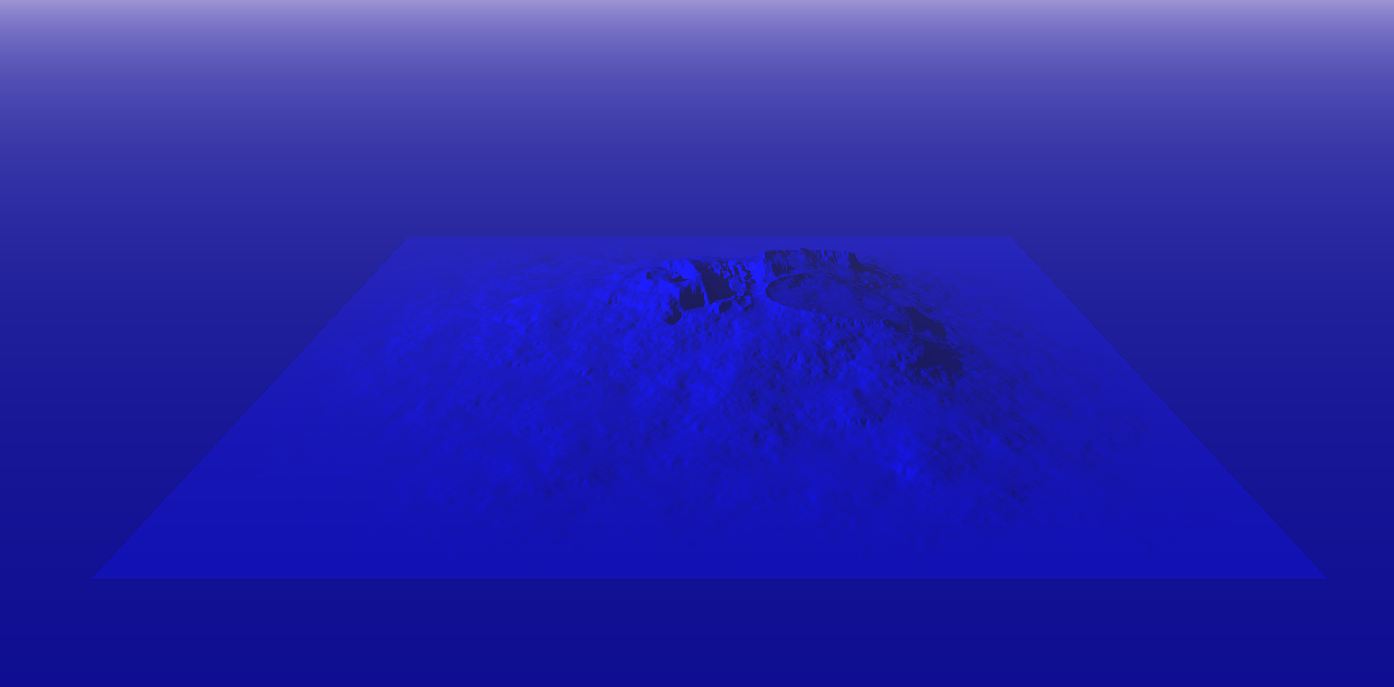
GeoControl.

The basis for my work is the image of Catalina Island, I wanted it to have more of an island feel, not a massive land mass like a desert or the alps :) 
The letter and number that is in the image below is 3 and o just incase it wasn't obvious enough 


I tried to add the texture in but it's not adding!!! I don't know what I'm doing wrong, I followed the tutorial and it's still not working so I think i'm going to create another island and start over ...


Second island


 The island ended up looking like wet sand on a beach .. when the waves destroy it. My question is .. why does it end up like it gets ruined when it's imported into cryengine, but in geocontrol it looks 100x better than it actually is?


Custom Texture


Tuesday 17 July 2012

User Interface Panels – Overview

Five Shortcuts or buttons

1. Ctrl + T is to select objects .
2. Ctrl + C while selecting an object lets you copy the object then you can paste it into your environment (Ctrl + V).
3. They key M is to open the material editor dialogue.
4. To snap and object to the Grid you can press the key G
5. Press Ctrl + G to enter game mode, to exit simply press Esc

Viewports

3 Ways to move around in the level

1. Pressing "w" you move forward , "s" to your left and "d" to your right
2. Pressing the right mouse button you can move your view around, and pressing he middle mouse button you can pan around the environment.
3. You can also scroll your mouse wheel to move forward or backwards.

Customising the Editor

5 Ways to customise the sandbox editor setup

1. The first way (and in my opinion, the most efficient) I could set up my Sandbox editor is to drag one window into another creating panels at the bottom of the window that was open.
2. Another way is to attach the tools that you prefer to either the top, bottom, left or right of the view port.
3. The console (the window always open upon start up)could also be detached and attached to the roll up bar or another window that you prefer.
4. Another way of customising the editor is to put comments in your toolbars. Creating a new toolbar is useful, and you can put things like the time of day,  lighting, physics etc onto your new toolbar.
5. Turning on the shortcut option when the mouse is hovering over a button allows me to learn what keys to use for shortcuts and makes my workflow more efficient.

Monday 16 July 2012

Overview of the CryENGINE 3 Sandbox User Interface

10 Tips and Tricks of the Sandbox User Interface


I've used cryENGINE for ARCH1101 but I found out some new knowledge whilst watching the tutorial on the "overview of the CryENGINE 3" that i initially didn't know. These shortcuts and tips and tricks will help my overall workflow :)


1. By right clicking perspective at the top left of the screen, under terrain opens a dropdown list, I was particularly interested in the subsection of the list called "view" where you could change the viewport camera being top, front, left, perspective, map view model preview and zview.


2.  Holding the Alt and the middle button together will allow you to rotate the object around.


3. Another shortcut that I did not know was right clicking the aspect ratio numbers on the top right hand corner next to the roll up bar to change the viewport size.


4. Using the Middle mouse button allos you to swiftly go through your environment.


5. Ctrl+Shift+Clicking somewhere with an object selected quickly moves the object to that position when in move mode.


6. A shortcut to the material editor is by pressing the M key which will will automatically open the Material editor.  


7. Again, by clicking perspective a separate subsection under the perspective options were other important aspects of sandbox, the ones which I will be using regularly is the flow graph, material editor, terrain editor, terrain texture layer and the time of day.


8. Something that may be not that useful to some people is using the wire frame view which could be turned on with the F3 button.


9. A button that has another subtle short cut is the back button on the top left of the screen, you have to click the small arrow button next to the back button on the top to quickly select the previous changes you've made to the environment without constantly clicking the back button.


10.There is a search bar right next to the aspect ratio clicking it and typing an object name I've put into my environment that I want to modify, remove, or add to it I can to it efficiently by using this method. I have never used this feature so it would definitely help me find the objects that I placed in the environment much more quicker.

Getting Started And Folder Structure

What I learned about the Sandox folder structure

1. To find the actual folder of cryengine you should click Program files (x86). Then click the folder Electronic Arts and then click cryENGINE then Click Bin 64 and then finally, you should find an application called "Editor.exe". Thus, when you click the Editor.exe it should open up cryENGINE 3 game editor :)
2. Code folder holds examples of scripts
3. System.cfg in the cryengine folder allows the player to edit anything in the engine which will allow you to create new laws/rules within the game to make workflow more easier.
4. Engine folder holds shaders or anything engine related
5. Game folder holds .pak files which are basically animations, game data, music, materials, textures and the like.